The following steps will get you set up to use RADIUS authentication with your UniFi Security Gateway (USG) and a windows NPS Server, which is joined to an Active Directory Domain. This will allow users to use their current AD credentials to authenticate to the VPN.
I am using the UniFi controller version 4.6 and Windows Server 2012 R2.
Security Alert: This method uses Point-to-Point Tunneling Protocol (PPTP), which has security issues, one of which is a security flaw in the MSCHAPv2 protocol used for authentication. I would personally not use this in a production environment that required even a slight amount of security, but since it’s the only option at this point, I suppose it may come though in a pinch.
Step 1: Configure the USG
- Create the remote access network. In the UniFi controller, go to Settings, then Networks, and click Create New Network, and select Remote User VPN.
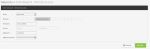
- Fill in the appropriate subnet information for your environment.
- For RADIUS IP, fill in the IP of your Windows server that will be running the NPS server.
- For RADIUS Password, you can enter anything you like, as long as it matches the server. In the next step, we will generate a very secure password in the NPS config that you can use here.
- Click Save.

Step 2: Configure Windows NPS Server
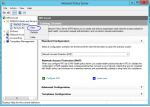
- Install the Network Policy and Access Server role using Add Roles and Features.
- Once installed, we need to add a new RADIUS client. Right Click on RADIUS Clients and click New
- Fill in Friendly Name with a text string of your choice, I used UniFi Gateway.
- Fill in the IP Address of the inside interface of the USG. This is the IP that the RADIUS requests will come from.
- Click the Generate radio button, then click the generate button.
- Copy the text that was generated and put it into the RADIUS Password field in the UniFi controller. You could just use any text string here, just note that this is used to secure the RADIUS request, to don’t use something weak.
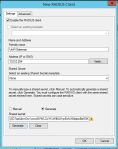
- Click OK.
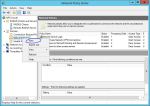
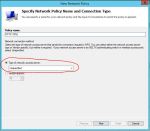
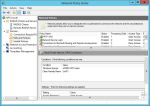
- Back in the Network Policy Server window, right click on Network Policies, and then click New.
- Enter a policy name and leave Type of Network Access Server as Unspecified.
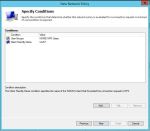
- Specify the conditions that this policy will be matched. Click Add.. and then select User Group, and pick the AD Group you want to use to allow VPN access. I used a group called VPN Users. Click Add… again and select Client Friendly Name. Enter the same thing you used in 2.3 above, or you can use a partial string to match. I used UniFI?.
- Leave the Specify Access Permissions at the defaults (Access Granted, Dial-in box unchecked).
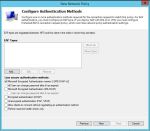
- Uncheck all authentication methods other than MS-CHAPv2.
- Accept the defaults under Configure Constraints
- Leave all setting at the default on this page except for under Encryption. Uncheck everything except for MPPE 128-bit.
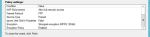
- Check your settings on the last page.

- Finally, move the new policy above the two default policies in the list by right clicking and choosing Move Up


Please let me know if this worked or didn’t work for you so I can update for others.
